Monday 4 November 2013

Christmas Markets

Now Halloween is over and the Christmas ads are already appearing on TV, it might be OK for me to mention the word without you holding your head in your hands and moaning 'Noooooooooooooo'.  Although of course, you may want to do that anyway.

So, how do you fancy buying handmade this year?  You get to support independent and talented designer-makers as well as finding fantastic original gifts for your nearest and dearest.

The Shark Alley diary isn't quite as bulging as it was last year, but here are a few dates for yours if you would like to join in the fun. 

NOVEMBER

Christmas Open House
202 Ditchling Road, Brighton BN1 6JE.
Held over three weekends, this is a chance to do your shopping in the comfort of an artist's home.
Saturday 16th & Sunday 17th November, Saturday 23rd & Sunday 24th November, Saturday 30th & Sunday 1st December 11am - 5.30pm.


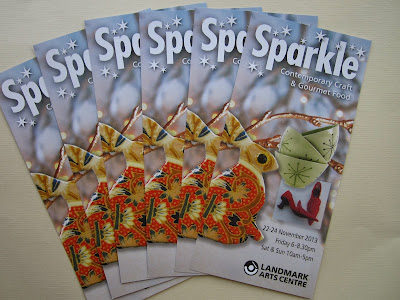
Sparkle Contemporary Craft & Gourmet Food Fair 
The Landmark Arts Centre, Ferry Road, Teddington, Middlesex, TW11 9NN.
Over 70 designer-makers under one roof in a beautiful listed church.  Food & drink available.
Friday 22nd November  6pm - 8.30pm
Saturday 23rd & Sunday 24th November 10am - 5.00pm
Click here for more details.


Craftaganza
Fabrica, Duke Street, Brighton, BN1 1AG.
The event will be held over two weekends, but come and find Shark Alley there on
Saturday 30th November 11am - 5pm


*EXCLUSIVE* 
Sign up to the Shark Alley newsletter before 12th November to receive up to £10 off Shark Alley goodies at forthcoming fairs (excluding Christmas Open House).


DECEMBER

Diggin' Design
The Garden Museum, 5 Lambeth Palace Road, London SE1 7LB.
This event features gifts and foods with an eco-friendly and sustainable theme.  Food & drink available plus animals in residence!  Sounds like a fab day out.
Saturday 1st December 10am - 5pm


Bright 'n' Crafty
Corner of Montague Place and St George's Road (big red brick building) Brighton, BN2 1JT.
A new market on the Brighton scene, this would perfect for those last minute purchases, and is Shark Alley's last event of 2013.
Saturday 14th December 10am - 5pm 

Monday 28 October 2013

London Zoo

When my boyfriend proposed a trip to London Zoo, my (default) response was (adopts whining tone) "I'm too busy.  I have to work".

But most weekends have been devoted to non-pleasurable activities of late, so I thought yeah, why not?  The zoo is always a great place for reference too - the photos I took there in 2010 formed the basis for the otter sewing patterns that I created.

Despite the rain, we had a great time (not too crowded either!).  Here are some of my favourite pics.


Wednesday 23 October 2013

Stu - Stu - Studio

Mucho disruption over the last month or so, as I have done something quite alien and ghastly - initiated a big change and moved studios.

I had been in my studio for around twenty years or so and loved it very much, but over the last year or so, my circumstances have changed and I felt that I needed a space that suited my needs more.

L-R  A LOT of doors and locks require a lot of keys; boiler pipes have never looked so arty; my otters have settled in nice; messing my space up good.

Miraculously, a space at another studio came up.  Ten minutes from home, one minute from where I work part-time, a third of the price - and full of crafters.

L-R There's a fridge, microwave and kettle - what more could you want?; What Kate Does; Hania's silver-smithing equipment; Sue's textile space.

Moving was horrible, both physically and emotionally, and I still feel sad (and a wee bit panicky) but it's also exciting to be somewhere new and I can use my time more effectively there, which is paramount at the moment with the lead-up to Christmas.

L-R Entrance at rear; door furniture; part of Kate's tin collection; Sal's space is testament to a clutter I can only dream of achieving

The new studio is less cosy and neat than The Annexe, but I love the crafty chaos that abounds.  This means I feel OK about the huge amount of mess I specialise in whilst working.  Many new creations have been cooked up already and I feel a little bit more relaxed about life now I'm settling in.

L-R A great view of the neighbourhood back yards; ribbons and reels; casting some malachite effect resin (I hope) ; Sal's wonderful space in full

But one day, THIS will appear on my desk.  


AAARRRGGHHHH.


Monday 9 September 2013

Creating Resin Necklaces

After thinking about it for quite a long time, FINALLY I am making some new resin necklaces to add to the existing Shark Alley collection.

It's quite a time-consuming process even before the pieces are actually cast and finished.

Here's how it starts.

1. The images that I'm going to use for inspiration are collected together and I have them in front of me while I draw.


2.  The designs are sketched out and then refined until they're simple and graphic.


3. I cut the shapes out of cardboard and practice putting them together to make sure they will hang together properly and work as necklaces.  This is also the time to work out where the holes will need to be drilled in the finished resin pieces.


4.  Each design is then placed over rolled-out modelling clay and tiny pin pricks are used to transfer the design onto the clay's surface.


5. Then the shapes are carefully cut out using a scalpel.


6.  When the clay has hardened, the shapes are smoothed and refined using sandpaper and sanding and buffing tools.


7.  Each finished piece is laid into a mould made from acetate, then silicon is poured in.


8.  After 24 hours, the moulds are turned out.  Unfortunately the silicon has oozed underneath the shapes, so I'll have to trim it away with scissors.


9. Ta-dah!  Three moulds all ready to be filled with resin.


Stay tuned for the finished articles!  Hopefully not too long to wait.

Friday 5 July 2013

Work In Progress

When I still had the time to design textiles, I produced this elaborate fox design.  It duly got sent off to my agent, but never sold.


This turned out to be a GOOD THING.

Whilst being interviewed for my job at U-Handbag, one of the girls went crazy for the design and suggested I do something with it myself, as she was sure it would be really popular.  As it clearly wasn't doing anyone any good tucked away in a portfolio in London, I duly got it back and turned it into cards, prints and purses.

That girl was right.


Now I want to design more animals in the same style, but finding the time has been a problem.  At last I've finally made a (slow) start on another British animal - a lovely hare - and have taken to putting screen shots of it in progress on my Facebook page.  I've never recorded work in progress in this way before, but it's interesting to see how the design changes and evolves on its way to completion.

Here's the story so far.


1. The hare shape is drawn freehand, scanned in, and then redrawn and refined as a flat, graphic shape in Illustrator.  Floral pattern details are drawn separately and then added to the hare's body.


2. The colours are decided upon.  I aim to make them representative of the hare's natural colouring and markings, but with some license!  Areas of pattern are starting to take shape.


3. This is the hare after a decent amount of time spent on it one evening.  At this stage, I really want to feel that the design is working, and that has required some changes in patterns and layout.  Having a background colour helps (with some alternative choices on the left!), though this may change when the hare is completely finished. This happened with the fox, which originally had a dark olive background.

UPDATE: 3rd August


4. Still fiddling with colours and patterns and having trouble balancing the blacks.


5. The hare is finished, printed out and ironed onto fabric.  However, I think the darks look too dark and the hare's hindquarters are too big and rounded.  Some more tweaking is required.


6.  The hare's bottom has been re-drawn and made less rounded and the dark colours have been made lighter, with the black being taken out all together as it's too contrasty.


7.  The hare is finished!


8.  Printed out, cut out and ironed on - now for the big reveal!


9.  The hare is applied to lots of different fabrics to make into purses.

Saturday 4 May 2013

Private View - 202 Ditchling Road

Sadly I could only make it to one of the Open House private views last night - they do all tend to be on the same night, which is tricky!  One year I managed to fit in three, but logistically that wasn't going to happen this time.

The sun was out, so the beautiful garden was put to full use, showing off glass by Annie McMullan and sculptures by Chris Brooks amongst others.


LOADS of people turned up, which was lovely, and house-owner Polly Raynes provided some seriously tasty canapés to soak up the wine.  My Cheese Oxo Biscuits lasted about five minutes - I knew I should have made double.


To be honest, I'm usually pretty hopeless at private views.  Rather than work the room or even stand helpfully next to my display, I tend to chat to friends and guzzle way too much wine. It was great to see everyone though.


The house is now open for four weekends throughout May from 11am to 5pm.  For more info, click here.  I'm also showing at 56 Tivoli Crescent.


Thursday 2 May 2013

Private View Nibbles - Mum's Cheese Oxo Biscuits

I've been meaning to pop a recipe up on here since Christmas, when I wanted to treat you to my take on the sumptuous Italian gorgeousness that is Chocolate Salami.

Sadly, I was far too busy (maybe this year) so please forgive me and accept this humble offering instead.

I remember loving these biscuits as a kid and I've been nagging Mum to dig out this recipe for ages, but she couldn't find it.  Finally it turned up, so I'm baking a batch for the Ditchling Road Open House private view tomorrow evening.  Why not knock up a batch of your own and recreate the full PV experience by looking through an art book or something while you scoff them with a glass of wine.

CHEESE OXO BISCUITS

INGREDIENTS
4oz plain flour
4oz margarine
3oz Cheddar cheese
1 Oxo cube (I used the vegetable one, but the original recipe calls for the red one)

METHOD

1. Rub the margarine into the flour until the mixture resembles breadcrumbs.


2.  Grate in the cheese.


3. Crumble in the stock cube, knead the mixture together to form a dough, then cover and put in the fridge to rest for half an hour.


4. Roll out the dough thinly onto a well-floured surface.


5.  Cut out shapes with a cutter (or small glass) and lay on a well-greased baking sheet.


6.  Bake in a pre-heated oven (170º fan/190ºC/350ºF) for 15 minutes.


7. Remove from oven and leave to cool.


8.  Leave washing-up in the hope that boyfriend will do it.